Con las expectativas de los clientes más altas que nunca, es imprescindible que su equipo de asistencia ofrezca un servicio rápido y eficaz para satisfacer esas necesidades.
Según estadísticas recientes, es 2,4 veces más probable que los clientes se queden con una marca cuando sus problemas se resuelven rápidamente.
Pero, ¿cómo puede garantizar una asistencia perfecta las 24 horas del día? La respuesta es sencilla: añada un chat en directo a su sitio web.
Una herramienta de chat en directo puede mejorar rápidamente la interacción con el cliente y proporcionarle asistencia en tiempo real, mejorando significativamente su satisfacción.
Esta guía paso a paso le guiará a través del proceso de cómo agregar chat en vivo a su sitio web, por lo que es más fácil para su negocio para ofrecer soporte instantáneo y elevar su experiencia del cliente.
¿Por qué añadir chat en directo a un sitio web?
La asistencia por chat en directo puede cambiar las reglas del juego de su servicio de atención al cliente, transformando la navegación pasiva en compromiso activo.
A diferencia de los formularios de contacto tradicionales o el correo electrónico, el chat en directo ofrece interacción en tiempo real, lo que le permite atender las consultas al instante y reducir el tiempo de respuesta.
Estas son algunas de las principales ventajas de implantar el chat en directo:
Aumento de las ventas y las conversiones
Las estadísticas muestran que la introducción de una función de chat en directo puede aumentar las conversiones entre un 8% y un 20%. Desde la asistencia inmediata hasta las oportunidades de venta cruzada, el chat en directo permite a los agentes evaluar y responder mejor a las necesidades de los clientes.
Generación de clientes potenciales
Las invitaciones proactivas al chat pueden convertir rápidamente a los visitantes del sitio web en clientes potenciales cualificados. Al llegar a los clientes potenciales antes de que inicien el contacto, puede animarles a compartir más sobre sus necesidades.
También puede utilizar encuestas previas al chat para recopilar datos de los visitantes. De este modo, podrá enviar esta información directamente a su CRM, lo que agilizará el proceso de cualificación de clientes potenciales.
Disponibilidad 24/7
El chat en directo ofrece asistencia inmediata durante el horario laboral, garantizando que los clientes reciban ayuda rápidamente.
La mayoría del software de chat en directo también permite la integración de chatbots, lo que posibilita la gestión de consultas fuera del horario laboral. Los chatbots pueden tratar al instante las preguntas más frecuentes y, para cuestiones más complejas, pueden transferir las solicitudes de chat a agentes humanos en cuanto estén disponibles.
Cómo integrar el chat en directo en un sitio web
Integrar servicios de chat en directo en su sitio web puede hacerse en unos sencillos pasos:
Paso 1: Elegir el software de chat en directo adecuado
Seleccionar la herramienta de chat en directo adecuada es crucial para maximizar sus beneficios para su empresa.
He aquí algunas consideraciones para guiarle a la hora de hacer la mejor elección:
- Solución basada en la nube: Optar por una solución de chat en directo basada en la nube significa que la empresa de software se encarga de todo: almacenamiento, rendimiento, seguridad y mantenimiento. Esto elimina la necesidad de alojar el software en tus servidores y reduce tu carga informática.
- Diseño adaptado a móviles: En 2023, hubo un 313% más de visitas en móviles que en ordenadores de sobremesa. Por tanto, todas las funciones deben verse y funcionar bien en los smartphones.
- Interfaz de visitante: El chatbox debe proporcionar una gran experiencia de usuario en todos los dispositivos. Su software debe permitir la personalización del widget de chat para que coincida con su marca y garantizar que tenga un aspecto atractivo y sea fácil de usar.
- Interfaz de agente: Dado que sus agentes utilizarán mucho el software de chat en directo, es importante que la interfaz del agente tenga una interfaz de usuario y una interfaz de usuario y usuario bien pensadas. Una interfaz intuitiva y fácil de usar puede aumentar la productividad de los agentes, reducir el tiempo de formación y mejorar la calidad general de las interacciones con los clientes.
- Análisis e informes: Unas sólidas funciones de análisis e informes son esenciales para hacer un seguimiento del rendimiento y comprender las interacciones de los clientes. Busque un software que le permita enviar encuestas posteriores al chat y que ofrezca información detallada sobre varias métricas clave del chat en directo, incluida la puntuación de satisfacción del cliente (CSAT).
Social Intents es uno de los mejores software de chat en directo para empresas, ya que ofrece funciones adecuadas para marcas de todos los tamaños.
Con más de 65.000 organizaciones que utilizan la integración de chat en directo, aquí es donde destaca Social Intents:
- Integración perfecta: Se integra con Slack y Microsoft Teams, lo que permite a sus agentes utilizar las principales plataformas de comunicación interna con las que probablemente ya estén familiarizados. Esta integración garantiza una transición fluida y mejora la productividad.
- Carga asíncrona: Nuestro widget de chat en directo se carga de forma asíncrona, lo que garantiza que no obstaculiza la velocidad de carga de su sitio web. Esta función mantiene el rendimiento de su sitio web al tiempo que proporciona una excelente atención al cliente.
- Integraciones completas: Antes de elegir una herramienta de chat en directo, asegúrese de que se integra con su sistema de tickets existente, CRM y otras herramientas de atención al cliente o ventas. Social Intents ofrece sólidas integraciones para agilizar sus operaciones y mejorar la eficiencia.
- Características adicionales:
- Integración con chatbot: Automatiza las respuestas a las consultas más habituales.
- Intercambio de archivos: Permite intercambiar fácilmente documentos e imágenes.
- Indicador de mecanografía: Muestra cuando los agentes o clientes están tecleando.
- Transcripciones de chats: Mantén un registro de las conversaciones para futuras consultas.
- Notificaciones de chat: Asegúrate de que los agentes reciben alertas de nuevos chats.
- Mensajes enriquecidos: Incluye elementos multimedia en los chats.
- Respuestas enlatadas: Ahorra tiempo con respuestas preescritas.
- Enrutamiento del chat: Dirija a los clientes al agente o departamento adecuado.
Paso 2: Registrarse en Social Intents (es totalmente gratuito)
El proceso para añadir un chat en directo a un sitio web varía en función del software, pero Social Intents ofrece un proceso de configuración sencillo.
Aquí tienes una guía paso a paso para empezar:
- Regístrate: Visita Social Intents y comienza tu prueba gratuita de chat en directo. Puedes seleccionar un plan más tarde.
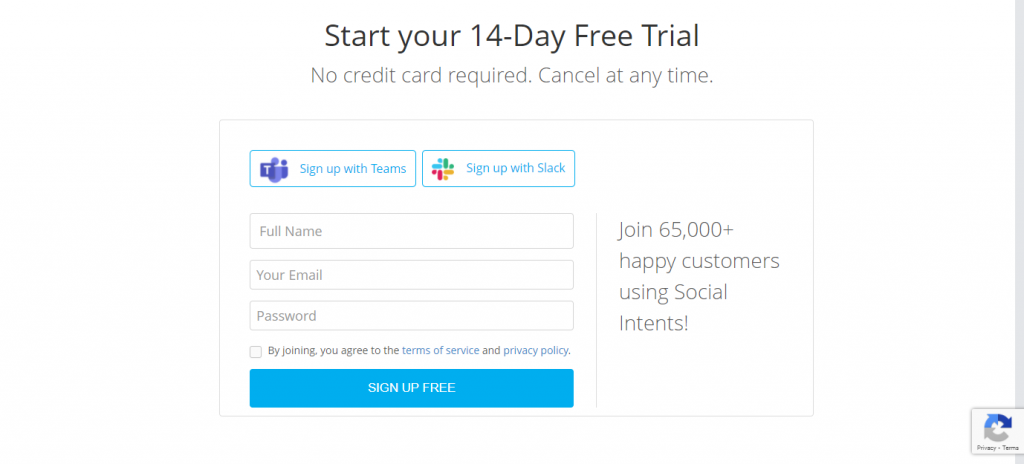
- Elige tu método de registro: Puedes registrarte mediante Microsoft Teams, Slack o correo electrónico.
Si elige hacerlo desde el sitio web de Social Intents, se le dirigirá a esta página:
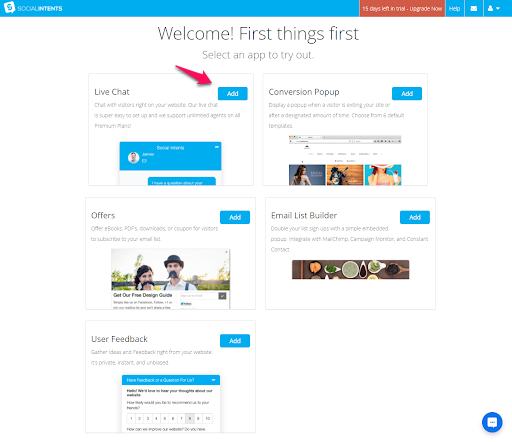
Haga clic en Añadir junto a Chat en directo para obtener su código de chat en directo personalizado.
- Opciones de configuración alternativas: También puedes añadir Live Chat by Social Intents directamente desde el directorio de aplicaciones de Slack. También puede añadirlo desde la tienda de aplicaciones de Microsoft Teams.
Paso 3: Añada el código a su sitio web
Al añadir Live Chat, aparecerá una ventana con un código HTML y una clave de widget para WordPress.
Si necesitas cerrarlo por ahora, siempre puedes recuperar el código y la clave más tarde desde el panel de Social Intents.
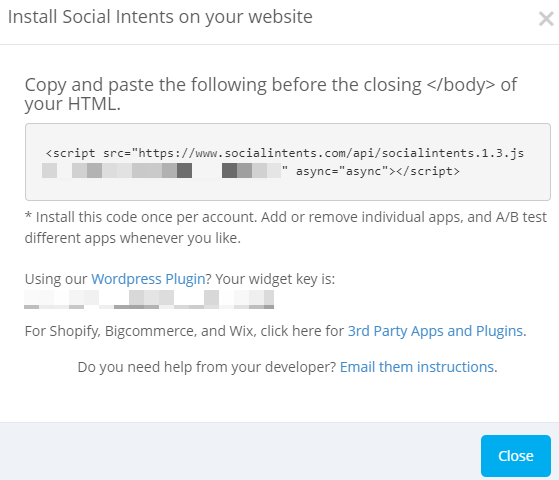
You can add the HTML code to any website by pasting it before the </body> tag of your website template. If you find this step challenging, our developers are available to assist you.
Para utilizar la clave del widget, instala primero nuestro plugin de chat en directo para WordPress. Una vez instalado, tendrás la opción de añadirlo en la configuración del plugin:
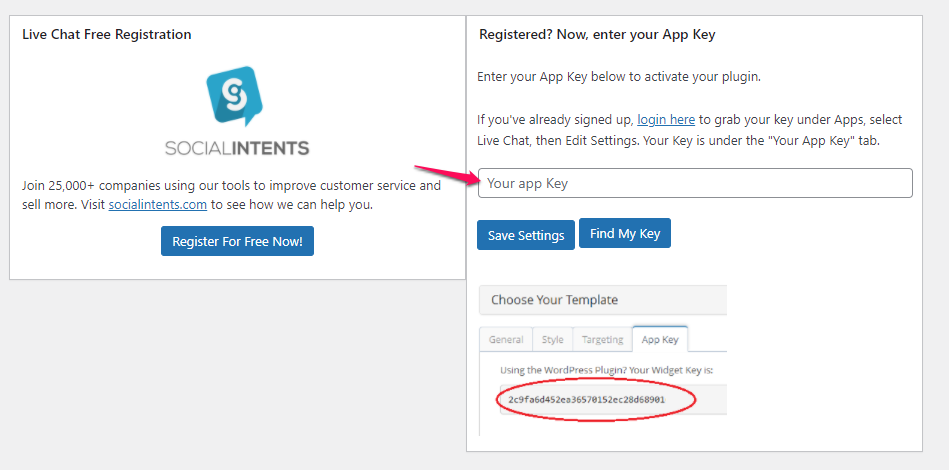
Sus visitantes verán ahora una ventana de chat en directo, que permite la comunicación y la asistencia instantáneas.
Paso 4: Personaliza tu ventana de chat en directo
Para editar la configuración del chat en directo, ve a Mis Aplicaciones > Chat en directo > Editar configuración.
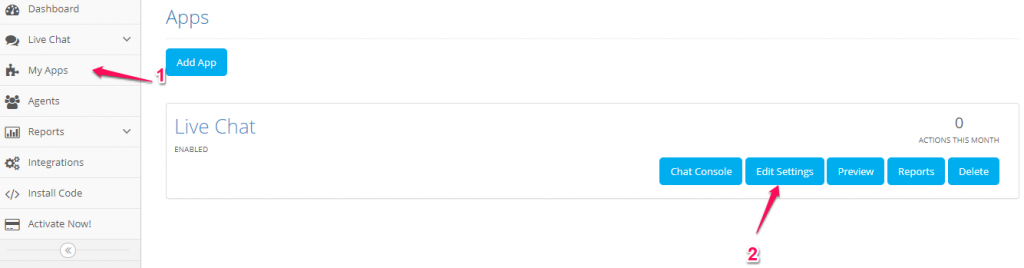
Aquí encontrará varias opciones categorizadas para adaptar su experiencia de chat en directo.
Ajustes generales

En ajustes generales, puede modificar lo siguiente:
- Nombre del Widget de Chat en Vivo: El nombre predeterminado es "Chat en vivo". Cámbialo por algo más personalizado, como "[Nombre de la empresa] Atención al cliente".
- Tipo de pestaña: Elija si desea mostrar la pestaña de chat en vivo como un icono o una tira de texto.
- Color de la pestaña: introduzca el código de color hexadecimal de su marca para asegurarse de que el widget de chat coincide con la identidad de su marca.
- Visibilidad de elementos: Alterne varios elementos como el botón de chat cuando no esté conectado, emojis, opción de carga de archivos, recuento de notificaciones, botón de comentarios del chat e historial de transcripciones del chat.
- URL del chat: Personalice su URL de chat en directo y utilícela en correos electrónicos, textos, etc. Los destinatarios pueden hacer clic en el enlace para empezar a chatear directamente con tus agentes de asistencia.
- Tiempo de espera: Establece un tiempo determinado tras el cual el chat finaliza por inactividad.
- Notificaciones por correo electrónico: Especifique una dirección de correo electrónico para recibir transcripciones de chat y notificaciones de chats perdidos.
Personalizar texto
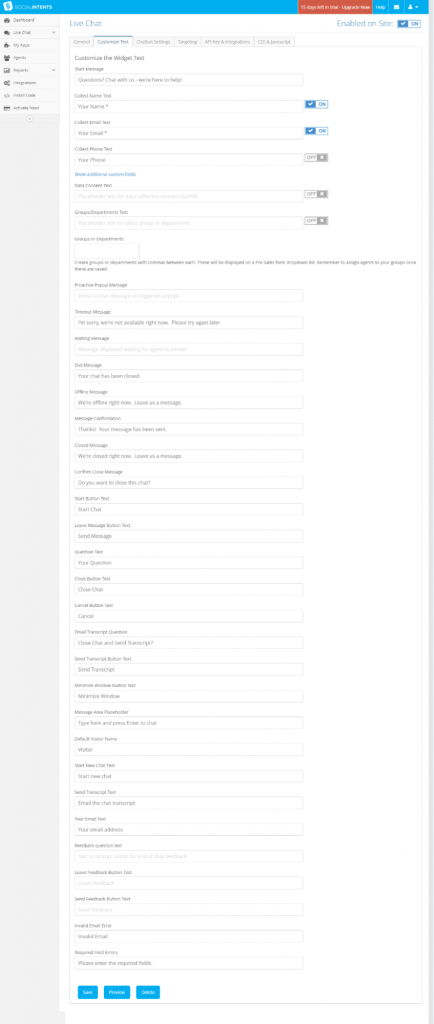
Ajuste la visibilidad y el contenido de todos los elementos de texto del widget de chat en directo:
- Campos de detalle de usuario: Decide si quieres que los campos de datos de usuario (nombre, correo electrónico, número de teléfono, campos personalizados) sean obligatorios u opcionales, y personaliza su texto.
- Mensaje de inicio: Personalice el mensaje predeterminado que ven los visitantes cuando hacen clic en el botón de chat, como "¿Preguntas? Chatea con nosotros: ¡estamos aquí para ayudarte!".
- Otros mensajes: Modifique los textos de las ventanas emergentes proactivas, las notificaciones de tiempo de espera, los mensajes en espera, las confirmaciones de mensajes, los mensajes sin conexión, los mensajes de fin, los mensajes cerrados y los avisos de confirmación.
- Lista desplegable: Añade un menú desplegable para que los usuarios seleccionen el departamento con el que quieren chatear, como "Soporte", "Ventas" o "Facturación".
- Texto de los botones: Personaliza el texto de varios botones, como iniciar, cerrar, salir del chat, cancelar, minimizar la ventana, enviar transcripción, dejar comentarios y enviar comentarios.
- Mensajes de error: Personalice el texto para los errores de correo electrónico no válido, errores de campo obligatorio, marcadores de posición del área de mensajes y mucho más.
Orientación del chat
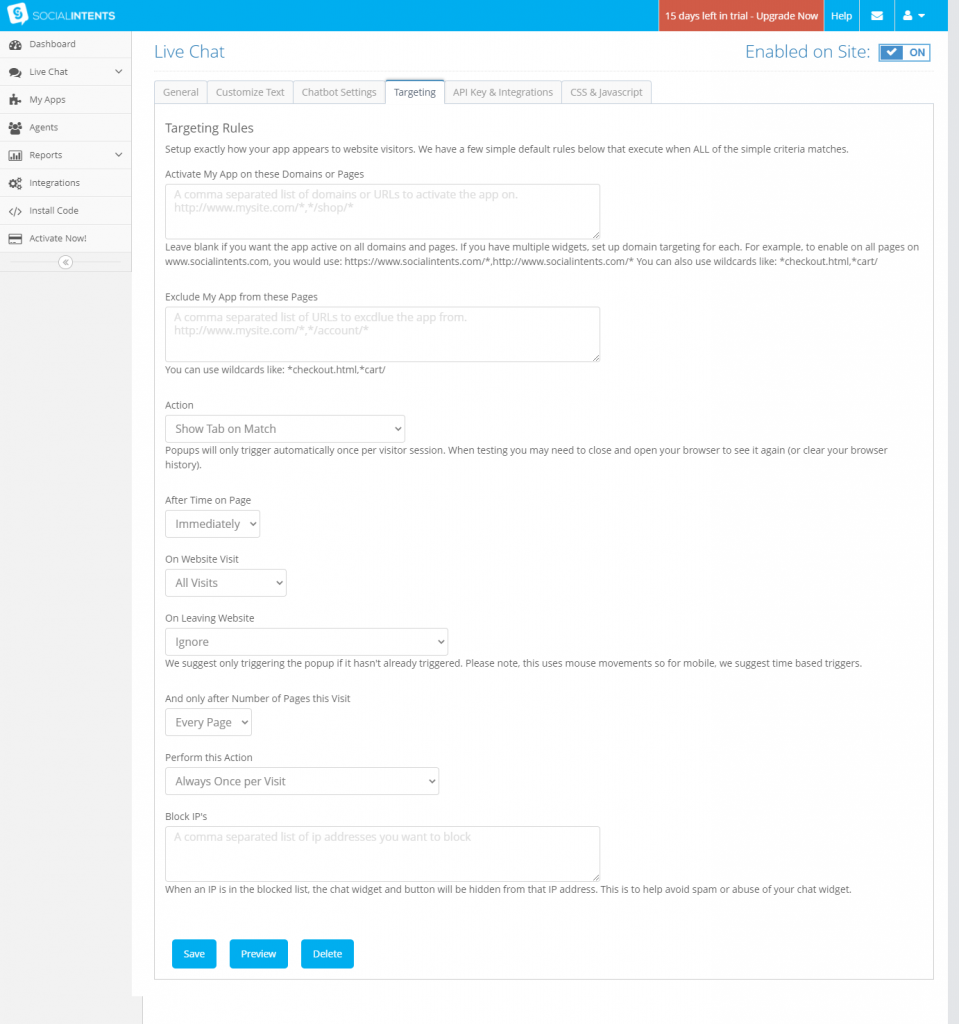
Defina con precisión cómo, dónde y cuándo aparece su chatbox con reglas de segmentación:
- Segmentación de páginas: Mostrar o excluir el chatbox en páginas web específicas.
- Activadores: Configure diferentes activadores de chat en función de las acciones del visitante. Por ejemplo, muestre mensajes de bienvenida específicos cuando el visitante vuelva o active una ventana emergente de chat de salida.
- Prevención del spam: Bloquea direcciones IP específicas para evitar el spam.
Otros ajustes de Live Chat
Mejore su chat en directo con opciones adicionales:
- Configuración de Chatbot: Configura un chatbot para gestionar varias conversaciones simultáneamente.
- Código personalizado: Añade CSS personalizado, código JavaScript o jQuery a tu ventana de chat para una mayor personalización.
- Google Analytics: Integre su ID de seguimiento de Google Analytics para supervisar los eventos de chat en directo. Social Intents proporciona su propio panel con métricas completas de chat en directo.
Paso 5: Saca el máximo partido a tus herramientas de chat en directo
Configurar el chat en directo es así de fácil. Ahora que la herramienta está en funcionamiento, céntrate en aprovechar al máximo sus funciones para mejorar la interacción y la atención al cliente.
Mejores prácticas de chat en directo
Empezar una interacción de chat en directo de forma eficaz marca el tono de toda la conversación. Estas son algunas de las mejores prácticas para guiarte:
- No haga esperar a sus clientes: Los clientes eligen el chat en directo por su naturaleza instantánea y en tiempo real. Los retrasos en las respuestas a los tickets de soporte pueden provocar una mayor decepción que las lentas respuestas por correo electrónico.
- Humanice las interacciones: Evite parecer un robot. Empiece con un saludo amistoso, utilice emojis y GIF, muestre la foto real del agente y demuestre empatía.
- Redacte mensajes claros: Los mensajes de chat deben ser breves, sencillos, sin jerga y gramaticalmente correctos.
- Termine con buen sabor de boca: asegúrese de que las consultas se resuelven por completo, pregunte si hay preguntas adicionales y solicite comentarios para mejorar la experiencia del chat.
Aumente la satisfacción del cliente con el chat en directo
Añadir un chat en directo a su sitio web es una forma eficaz de aumentar el compromiso y la satisfacción del cliente. Si elige el software adecuado y sigue las mejores prácticas, podrá crear una experiencia de atención al cliente fluida y agradable.
Para una solución óptima de chat en directo, elija Social Intents. Nuestra plataforma ofrece integración con herramientas populares como Slack y Microsoft Teams y se puede configurar en solo unos minutos.
No espere más: empiece con nuestra prueba de 14 días y añada chat en directo a su sitio web ahora mismo.