Integración con Dynamics 365
Captura clientes potenciales a partir de conversaciones de chat con IA y sincronízalos directamente con Microsoft Dynamics 365. Diseñado para organizaciones que dan prioridad al trabajo en equipo.
¿Qué es la integración de Dynamics 365?
Cuando los visitantes interactúan con su chatbot de IA y comparten información de contacto, esos datos se sincronizan automáticamente con Microsoft Dynamics 365 como un nuevo registro de cliente potencial o contacto.
Esto resulta especialmente útil para las organizaciones que utilizan Microsoft Teams para el chat en vivo, ya que los clientes potenciales se incorporan sin problemas a Dynamics CRM sin necesidad de introducirlos manualmente.
Diseñado para Microsoft Teams
Equipos + Dinámica
Los agentes chatean a través de Teams y los clientes potenciales se sincronizan automáticamente con Dynamics.
Inicio de sesión único de Azure AD
Autenticación de nivel empresarial a través de Azure Active Directory.
Sincronización de Dataverse
Integración nativa con Dataverse para una unificación completa de los datos.
¿Qué se sincroniza?
Cómo funciona
Conectar Dynamics
La autenticación de Azure AD mantiene tus datos seguros.
Configurar asignación
Asigne los datos del chat a campos estándar y personalizados de Dynamics.
Sincronización automática de clientes potenciales
Contactos y clientes potenciales creados en tiempo real.
How It Works: Power Automate Integration
The Dynamics 365 integration uses a Custom API Action in Social Intents that POSTs lead data to a Power Automate HTTP trigger. Power Automate then creates the Lead in Dataverse.
Integration Flow:
Requisitos previos
- Microsoft Dynamics 365 environment with Dataverse
- Power Automate license (included with most Dynamics 365 plans)
- Permission to create Power Automate flows and Dataverse records
- Social Intents Business plan or higher (AI Actions required)
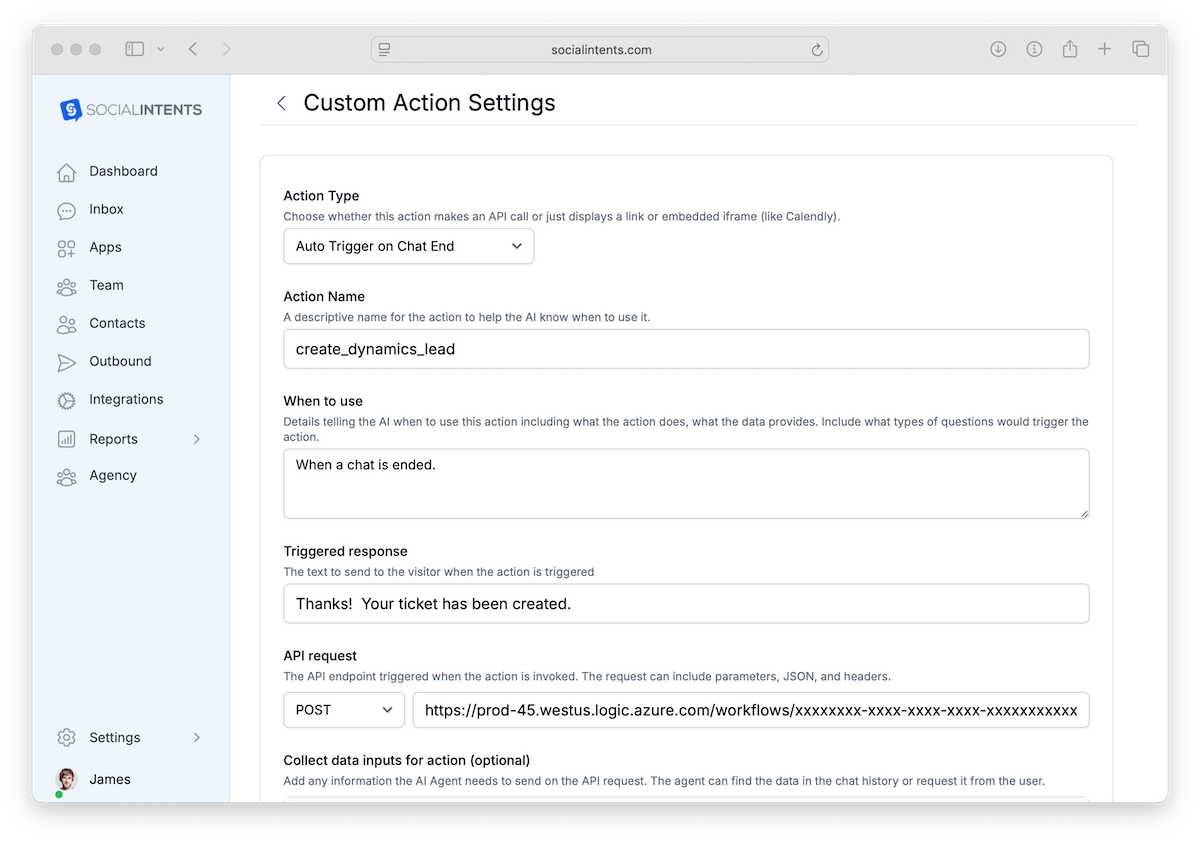
Step 1: Create the Custom API Action
In Social Intents, go to AI Chatbot Settings → AI Actions, click Add Action, and configure:
| Field | Value |
|---|---|
| Action Type | Auto Trigger on Chat End |
| Action Name | create_dynamics_lead |
| Collect data inputs | subject, firstname, lastname, company, email, phone, website, transcript, sessionId |
| HTTP Method | PUBLICAR |
| API URL | https://prod-XX.westus.logic.azure.com:443/workflows/YOUR_FLOW_ID/triggers/manual/paths/invoke?api-version=2016-06-01&sp=%2Ftriggers%2Fmanual%2Frun&sv=1.0&sig=YOUR_SIG |
| Headers | Content-Type: application/json |
JSON Request Body
{
  "subject": "{{subject}}",
  "firstname": "{{firstname}}",
  "lastname": "{{lastname}}",
  "company": "{{company}}",
  "email": "{{email}}",
  "phone": "{{phone}}",
  "website": "{{website}}",
  "transcript": "{{transcript}}",
  "sessionId": "{{sessionId}}"
}
Step 2: Create the Power Automate Flow
In Power Automate, create a new Instant cloud flow with an HTTP request trigger.
A) HTTP Request Trigger
Use “When an HTTP request is received” as the trigger. Paste this JSON schema so Power Automate knows the incoming data shape:
{
  "type": "object",
  "properties": {
    "subject":    { "type": "string" },
    "firstname":  { "type": "string" },
    "lastname":   { "type": "string" },
    "company":    { "type": "string" },
    "email":      { "type": "string" },
    "phone":      { "type": "string" },
    "website":    { "type": "string" },
    "transcript": { "type": "string" },
    "sessionId":  { "type": "string" }
  }
}
B) Add a New Row in Dataverse — Leads Table
Add a Dataverse → Add a new row action. Select the Leads table and map the fields:
| Dynamics 365 Field | Power Automate Dynamic Content |
|---|---|
| Topic (Subject) | triggerBody()?['subject'] |
| First Name | triggerBody()?['firstname'] |
| Last Name | triggerBody()?['lastname'] |
| Nombre de la empresa | triggerBody()?['company'] |
| Correo electrónico | triggerBody()?['email'] |
| Business Phone | triggerBody()?['phone'] |
| Página web | triggerBody()?['website'] |
| Description | concat('Chat Transcript (Session: ', triggerBody()?['sessionId'], '):\n', triggerBody()?['transcript']) |
C) Optional: Attach Transcript as a Note
Add a second Dataverse step — Add a new row in the Notes table — to attach the full transcript as a Note on the Lead:
| Field | Value |
|---|---|
| Subject | Transcripción del chat |
| Note Text | triggerBody()?['transcript'] |
| Regarding (Lead) | outputs('Add_a_new_row')?['body/leadid'] |
D) Response Action
Add a Response action to return a success status:
Status Code: 200
Body:
{
  "status": "success",
  "leadId": "@{outputs('Add_a_new_row')?['body/leadid']}"
}
Troubleshooting
Flow never triggers
Ensure the Power Automate HTTP POST URL is copied correctly, including the sig query parameter. Test by sending a manual POST from Postman or curl.
Lead created but fields are empty
Check that the JSON schema in your HTTP trigger matches the body your action sends. Mismatched property names will result in null values.
403 Forbidden error
The Power Automate flow URL may have expired. Re-save the flow to generate a new URL and update the API URL in Social Intents.
Más acciones de CRM
Unificar Teams Chat y Dynamics 365
Conecta tu pila de Microsoft y captura automáticamente todos los clientes potenciales.
Prueba gratuita de 14 días. No se requiere tarjeta de crédito.